Mike wrote:
>Woke up the Madrugada Mutt before the crack of dawn Sun the 13th. She's
>a real sound sleeper and worthless watchdog so I had to kick the
>doghouse to get her up. Headed out to see if we could get a possible
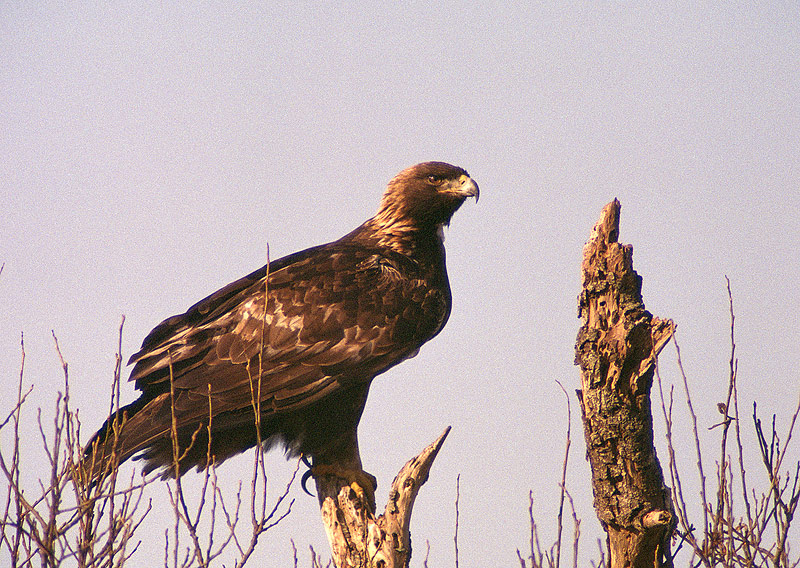
>TOPE shot or two in the can. I can't comment on that yet but did get
>this fellow a little after sunup.
>http://www.interisland.net/watershed/mike/WalkDogs/eagle2.jpg (202kb)
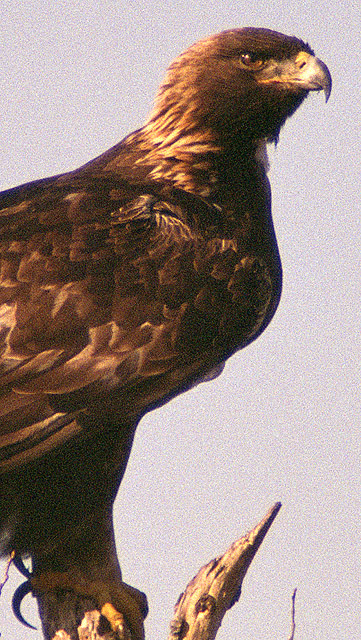
>http://www.interisland.net/watershed/mike/WalkDogs/eagle2a.jpg (132kb)
>
>
Great shot!!
This is one of the few places where a long mirror lens would work about
as well, with no background to show rings. :-) I'll have to see if I
can dig out a redtail shot with the 1000/11.
>.......
>Scanned on the FS4000. This is the first time I tried reducing the pic
>using a technique posted on photo net a while back. Basically apply a
>lot of sharpening at first then reduce size by half, sharpen less and
>reduce by half, sharpen even less, reduce, etc. I wasn't able to follow
>the process exactly without converting to 8bit.
>
I've tried this too, but without too much sharpening in the first step.
I couldn't come up with one action that worked well for most images, so
it was very tedious doing each one step by step. That's why I use FM Web
Presenter. It does just that, with choice of no, low or high sharpening.
I never use high. Sometimes low and sometimes none works right. The
beauty is that you can try them in only a few seconds each. If I really
want something in between, I do both none and low, copy the low on top
of the none as a layer (CTRL-A, then drag is fastest.). I can then
adjust the opacity of the sharper top layer until sharpness is just
right. Merge layers and you are done. MUCH faster than the other way as
I was doing it.
>Anyway the result _is_ sharper but I don't like the grainy background much. I
>guess i need to experiment some more.
>
>
Some things I might do:
For an image like this, I would select the sky (Magic Wand or Select
Color) and copy it as a new layer. Then sharpen only the background
layer. The sky on the other layer will remain unsharpened, with no grain
exaggeration from sharpening. Merge down and you have sharpened subject
and unsharpened sky.
Even with that technique, the subject itself is over sharpened. I
suspect the culprit may be over sharpening of the image in the first
step of the reduction/sharpen cycle continues, but it could be just a
bit too much at each step. Refinement of the process or a canned process
as above should fix that.
If stuck with the result, a lot can be done with a grain reducer. This
is what a quick trip through NeatImage does
<http://www.moosemystic.net/Gallery/eaglecombo.jpg>. The sharpness/grain
balance could be adjusted to individual taste, of course.
Moose
==============================================
List usage info: http://www.zuikoholic.com
List nannies: olympusadmin@xxxxxxxxxx
==============================================
|